implementing Civic UK Cookie Control with Google Tag Manager

In order to comply with GDPR data protection legislation, website users have to opt-in to have their data tracked.
With this in mind, the Civic UK Cookie Control software is becoming increasingly popular to help website-owners track user preferences and ensure analytics code is only loaded when agreement is given.
The Civic UK Cookie Control software is generally very easy to install – that is, as long as you’re only using Google Analytics and not Google Tag Manager.
We use Google Tag Manager (GTM) on the Pedalo site and could not find any recommendations for how to set this up with Civic UK Cookie Control. So we asked our friends at upriseUP to look into it and fortunately, they came up with a great solution.
Best of all, this solution will work on any site that has GTM – whether it’s WordPress, Drupal, Umbraco or any other CMS.
In this blog, we provide a step-by-step guide so you can set things up on your own website. As usual, make sure to do this on a test site version first – just in case you encounter any problems.
This guide is a bit more complicated that the average one and is mostly aimed at developers and site maintainers. If you need any support or advice, feel free to get in touch and we’ll be happy to help.
step 1: prepare your site
Remove all scripts that are on your sites and leave only the Google Tag Manager script. All other tags should be handled by GTM from now on, so you can control their behaviour based on users’ choices.
You should also remove any cookie bar plugin or software you might have previously installed, as you won’t need it anymore. And yes, that includes the Civic Cookie Control plugin – as you’ll now be loading your cookie popup through GTM!

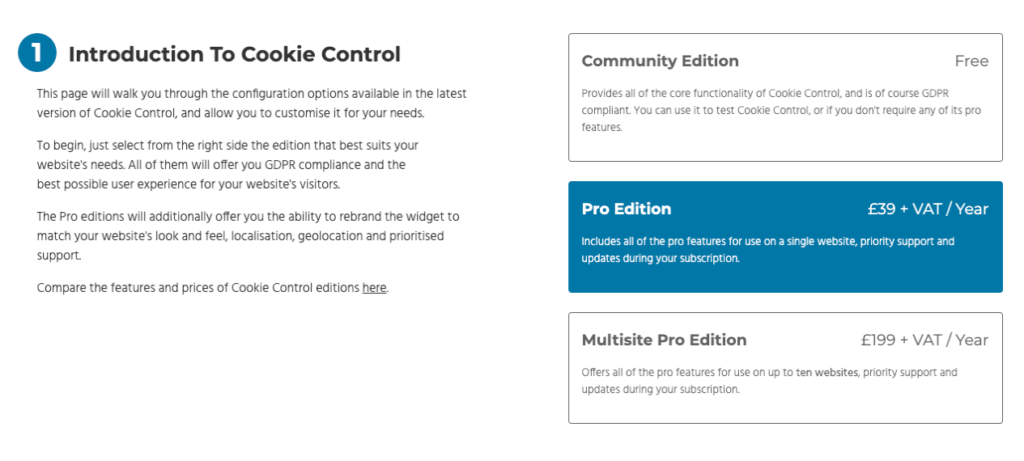
step 2: sign-up for a Civic UK account
Head over to the Civic UK website and sign-up for an account.
We recommend choosing the Pro version (£39+VAT per year for a single site), as this allows you to add your own branding. The Pro version is also necessary if you have a multilingual site. However, the free community edition will work fine for most sites.
Under domain, enter your development domain. Don’t forget to change this to the live domain when you’re ready to go live. You don’t need to add any categories for now, as we’ll take care of that later on.
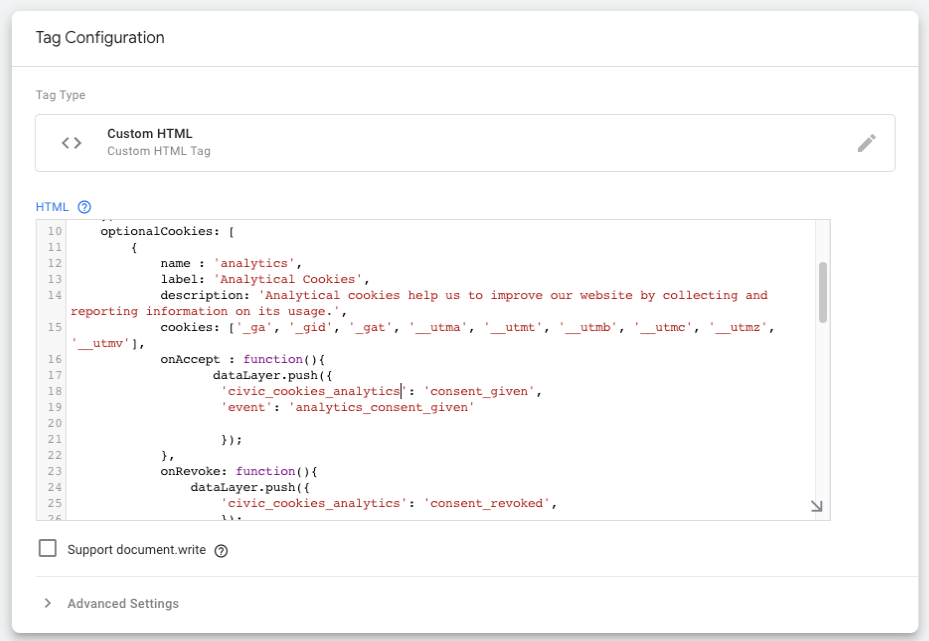
step 3: create HTML snippet in Google Tag Manager
Now for the fun part. Go to your GTM account and click on ‘Tags’ on the left-hand side and then ‘Add new’. Change the name to something like CivicUK JS code’, and choose ‘TagConfiguration’ and then ‘Custom HTML’.
Click the ‘Triggering’ box and choose ‘All pages’. In the HTML box, enter the following:
<script src="https://cc.cdn.civiccomputing.com/9/cookieControl-9.x.min.js" type="text/javascript"></script>
<script>
  var config = {
    apiKey: ‘enter_your_api_key_here’,
    product: 'COMMUNITY',
    text : {
        thirdPartyTitle : 'Warning: Some cookies require your attention',
        thirdPartyDescription : 'Consent for some third party cookies can not be automatically revoked. Please follow the link below if you want to opt out of them.'
    },
    optionalCookies: [
        {
            name : 'analytics',
            label: 'Analytical Cookies',
            description: 'Analytical cookies help us to improve our website by collecting and reporting information on its usage.',
            cookies: ['_ga', '_gid', '_gat', '__utma', '__utmt', '__utmb', '__utmc', '__utmz', '__utmv'],
            onAccept : function(){
                   dataLayer.push({
                    'civic_cookies_analytics': 'consent_given',
                   'event': 'analytics_consent_given'
                    });
            },
            onRevoke: function(){
                dataLayer.push({
                    'civic_cookies_analytics': 'consent_revoked',
                    });
            }
        },
        {
            name : 'marketing',
            label: 'Marketing Cookies',
            description: 'We use marketing cookies to help us improve the relevancy of advertising campaigns you receive.',
            cookies: ['fr'],
            onAccept : function(){
                   dataLayer.push({
                    'civic_cookies_marketing': 'consent_given',
                   'event': 'marketing_consent_given',
                    });
            },
            onRevoke: function(){
                dataLayer.push({
                    'civic_cookies_marketing': 'consent_revoked',
                    });
            }
        },
    ]
};
CookieControl.load( config );
</script>
Now, let’s break down what you see above.
First of all, you’ll need to enter the API key you received when you registered with Civic UK where it says ‘enter_your_api_key_here’.
You might also need to change the product from ‘COMMUNITY’ if you purchased the Pro or Multisite version. Also, feel free to change the Titles, Labels and Descriptions to match your requirements.
Under the ‘Optional cookies’, section you will notice that we have added two types of cookies – analytical and marketing, but you can add more (or less) if needed.
The important thing here is to set the variables and events under the ‘OnAccept’ and ‘OnRevoke’ functions correctly. And if you change the names, then don’t forget to change them for the rest of the following steps too!
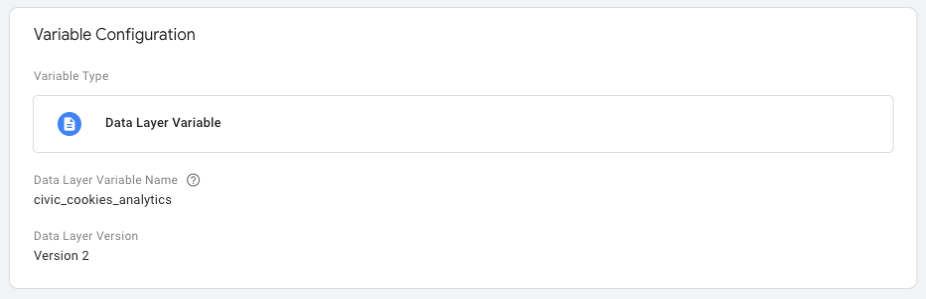
step 4: create consent variables
We now need to store a variable when a user accepts or declines cookies. We’ll need to separate these for the analytics and marketing cookies as in our example above, or for any other cookie options you’ve added.
In Google Tag Manager, click on ‘Variables’ on the left-hand side and then scroll down to ‘User-Defined Variables’ and click ‘New’. Give the first variable a name like CivicUK Analytics cookies and under ‘Variable Configuration’, choose ‘Data Layer Variable’.
Under ‘Data Layer Variable Name’, set this to civic_cookies_analytics. Leave ‘Data Layer Version’ set as 2 and ‘Format Values’ all unticked.
Finally, do the same again to create a variable for marketing and/or any other cookie options.
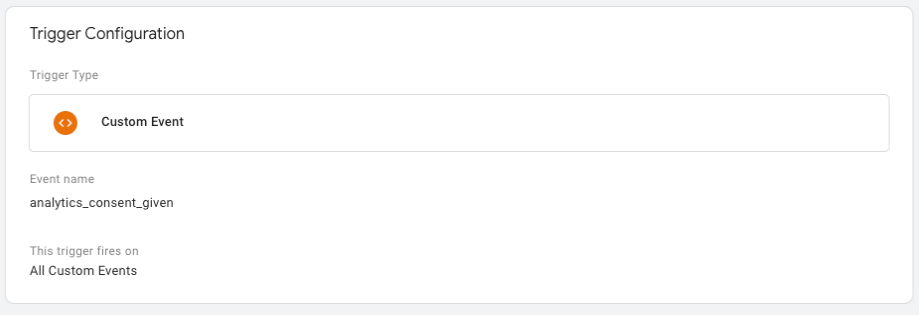
step 5: setup triggers
You now need to create two triggers for each variable. This means four triggers for our marketing and analytics cookies example.
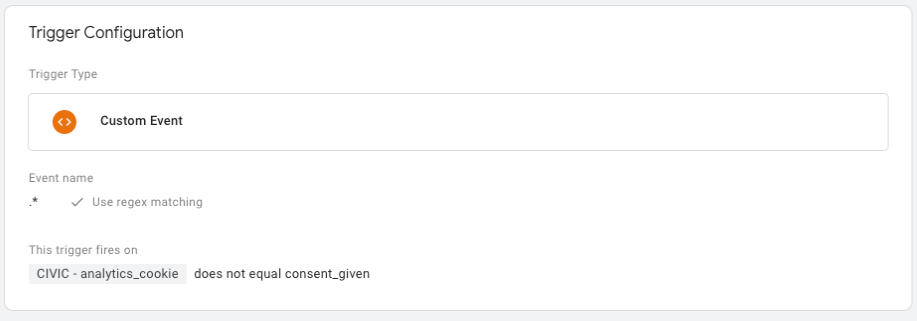
We’ll begin with the consent-given triggers. Go to GTM and click on ‘Triggers’ on the left-hand side. Next, click on ‘New’ and give the trigger a name like CivicUK analytics consent given.
Under configuration, choose ‘Custom Event’. Under ‘Event Name’, type analytics_consent_given. Finally, select ‘All Custom Events’ for ‘This trigger fires on’.
You’ll need to create similar consent-given triggers for marketing and/or any other cookie options.
Now, we’ll create a new trigger for when users refuse permission. Click on ‘New’ and give the trigger the name like CivicUK analytics consent NOT given.
This time under ‘Event Name’, type .* (full stop and asterisk) and tick the ‘Use regex matching’ box. This ensures that the trigger activates for every single trigger event.
Under ‘This trigger fires on’, choose ‘Some Custom Events’. Select CivicUK Analytics cookies (or whatever variable name you chose) on the first dropdown, ‘does not equal’ in the second and type consent_given on the third.
This means that this trigger will activate when consent has NOT been given. The instructions are written in the negative so that the tag doesn’t fire when consent has not been given.
Now create similar no-consent triggers for marketing (or other) cookie types.
step 6: link everything together
Now all that remains is to ensure we load or unload tags depending on whether consent is given.
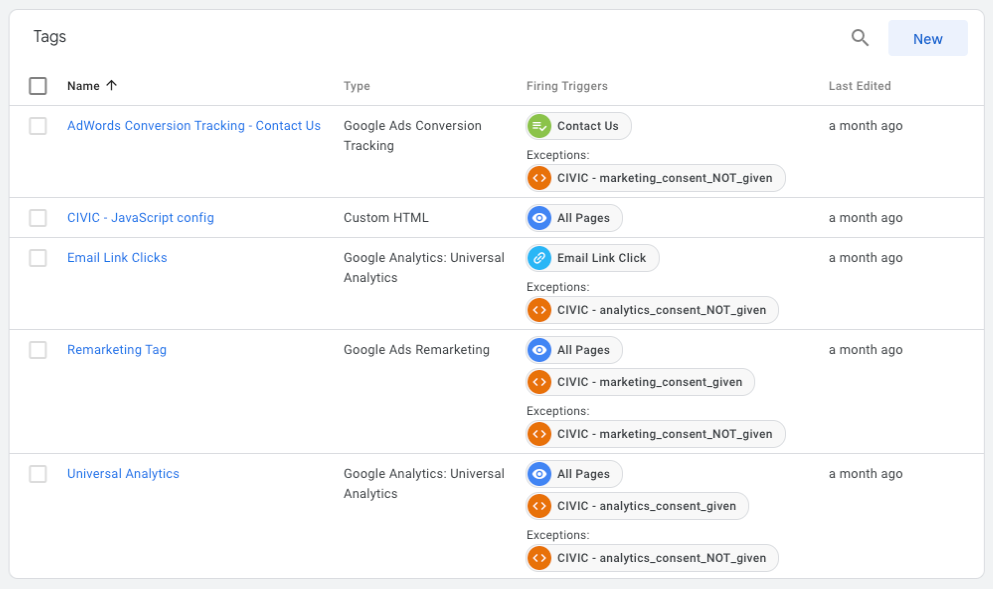
Go back to the main ‘Tags’ page in Google Tag Manager. Find a tag you want to edit – for example, you will probably have a tag for Universal Analytics.
Under triggering, you will probably already have a firing trigger for all pages. Click on the + in the top right and choose CivicUK analytics consent given. Then, under ‘Exceptions’ click on the + and choose CivicUK analytics consent NOT given.
Now we’ve got our consent variables set-up, it’s time to apply them to the necessary tags. For each analytics cookies tag that requires consent, click on the tag and add the trigger CivicUK analytics consent NOT given.
This means that this tag will not fire unless the user has granted consent for analytical cookies. Make sure to repeat for other tags and cookie types.
If a tag uses the ‘All Pages’ trigger, we also need to add the CivicUK analytics consent given trigger. This ensures that the tag is triggered immediately when the user gives consent.
Without this, some tags, such as Google Analytics pageviews, would not fire until the user browses to another page, thus leading to inaccurate data collection.
step 7: celebrate!
That’s it! the Civic UK Cookie Control software will now be running on your website.
This means that users will see a pop-up cookie consent form and tracking code will only be loaded when agreement is given.
Once you’re happy everything is working on the test version of your site, simply go back to your Civic UK account and change the domain to your live URL. This will ensure your site is complying with GDPR data protection laws.
If you encounter any problems or require any further support, please don’t hesitate to get in touch.
We’re an award-winning digital agency with more than two decades’ experience helping organisations optimise their websites and boost online results. We also have loads more great advice, tips and ‘how to’ guides on our blog.